Reduce Image File Size For Uploading
Pictures optimized for listing found on our web site are rarely larger than 200 kilobytes because the small file size helps the web site respond faster. But most pictures that are shot on a smart phone or a digital camera are upwards of 20 times that size. That amounts to upwards of 75 megabytes for only 25 images to attached to your New Listing form and every email server will reject such a large transfer. So for that reason, we ask that you reduced the file size of your images before you attached them to this form and send them to us... like this:
- Removed duplicate images or bad images that won't be used in the listing
- Make a copy of these images to reduce and keep the originals in a safe place
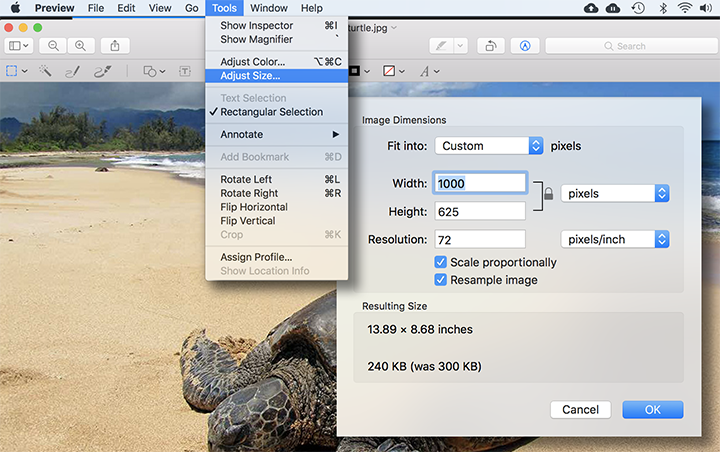
- Open each image in virtually any image processing program like Photoshop or any basic program like Preview (standard on Macs). See screen caps below for clarification.
- In the menu options, find anything that refers to "Image Size"
- Reduced the image to 1000 pixels wide at 72 dpi, and let the depth of the image fall where it may
- Save it and close it.
This will effectively reduced your file size by 80% making your images much more manageable and easy to attach and send.
Reducing File Size in Photoshop
Reducing File Size in Preview (Mac only)

Photography Tips
Most everyone can point and shoot, but very few of us can get good pictures. You don't have to be a professional photographer to get responsible results. Follow these simple, and sometimes obvious tips when taking pictures of your home, and it will go a long way in representing your property in a flattering light.
- Prepare or 'Stage' Your Home Before Shooting: Simply put... tidy up. Close garbage can lids, put the toilet seats down, make the beds, remove any laundry, arrange pillows, tidy up the kitchen and all living areas, turn on all the lights and open curtains. In short, prepare your home like you would for a social gathering.
- Frame The Picture: take a moment to really look at the image before you take the picture. Often you'll see obvious things like you have way to much floor, or way too much ceiling in the shot, or the center of interest is not centered. 2 seconds can make a big difference.
- Get It Straight: take a moment to check if your camera is level before you shoot, especially when looking at the ocean view. The horizon never looks quite right at a 10% slope.
- Where is The Light Coming From?: perhaps the most important thing to be aware of. It's always best if the light is behind you when shooting a picture, but this is often impossible when shooting a home. For instance, if you shoot an interior shot looking toward a window, most cameras will automatically expose for the brightest thing in the frame. What this does is give you a beautiful image of the view outside the window, but almost total darkness on the inside of the home. This can be fixed by forcing on your flash, or on a smart phone, touch the image on the screen that you want to be exposed properly. Some experimenting will likely be needed. Please only send shots with the best result.
- What To Shoot?: We often get lots of great images of home interiors, but often forgotten are exterior considerations. Understand what's important to potential buyers like the access road(s), views, exterior features like a garage, garden, yard, or bodega and don't forget about security features. A nice touch also is to show the surrounding area, or the closest town and the services offered there.
- Don't Zoom... Ever!: I recommend a standard wide angle lens (±24mm) be used for 99% of the shots. If you have the need for the subject to be larger in the frame, take a few steps closer.
- Steady As She Goes: The easiest way to ensure sharp pictures is to be completely still when you press the shutter. Any movement at all can cause a blur in the image. I like to take a breath, let it out, then click.


